Journal · From the Bench
Building a Leather Stamping Jig
Gordon Mielke builds his own stamping jigs in East Vancouver to land every maker mark and pattern stamp dead square on full-grain vegetable-tanned leather and Horween Chromexcel. A shop-made alignment jig turns a fussy, high-stakes step into a repeatable process — no factory fixtures, no guesswork, just a fixture cut and tuned on the same bench where the wallets, belts, and bags get made.
Why a Jig Beats Eyeballing It
Stamping cold is a one-shot deal. Once the steel hits the fibre, there is no undo. On a bifold wallet, the Raven maker mark sits centred on the exterior panel — 3 mm off centre looks deliberate in the wrong way. On a passport sleeve, the mark lands on a curved flap where the grain direction shifts. Eyeballing works until it doesn't. A jig removes the variable: the stamp registers against a hard stop every time, so the only thing left to control is hammer weight and leather moisture.
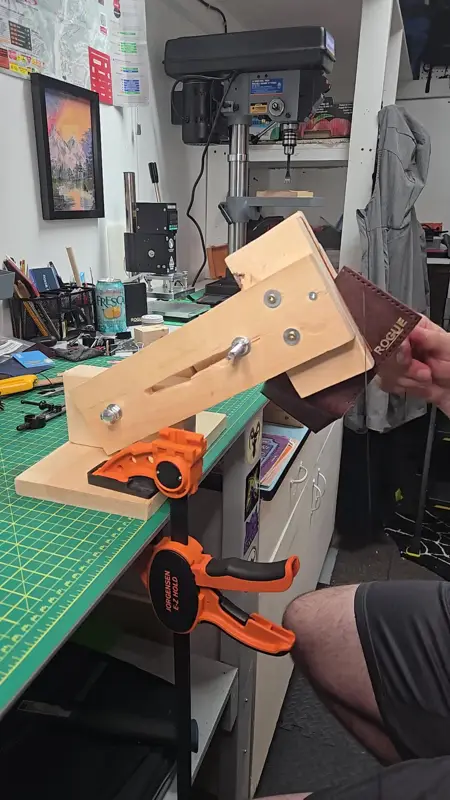
The video clip "Building the stamping jig" shows the blank getting laid out on the bench: hard maple for the base, brass for the wear surfaces, a few hours at the drill press and the bandsaw. No CNC, no outsourced fixture. The maker cuts the registration channels to match the exact outside dimensions of the wallet panel blanks he cuts from the hide. When the panel changes size — say, a long wallet versus a card holder — the jig gets a new insert cut from the same stock. That is the point: the tool serves the work, not the other way around.
What the Jig Actually Does
Registration, Not Just Location
A stamping jig is not a template. A template shows where; a jig holds the workpiece and the tool in a fixed relationship. The base clamps to the bench. The workpiece nests against two perpendicular fences — one long grain, one cross grain — so the panel cannot rotate. The stamp guide is a hardened sleeve bored to the stamp shank diameter, mounted on a vertical post that slides in a dovetailed way. You drop the stamp into the sleeve, it bottoms out on the leather, you strike once. The guide keeps the stamp vertical; the fences keep the leather square.
Repeatability Across a Run
Made-to-order means every piece is a batch of one, but the ROGUE Collection pieces — Classic Bifold from $115, Long Wallet from $140, Card Holder from $65, Passport Sleeve from $95 — share panel dimensions. The jig handles the common sizes with swap-in inserts. The clip "Working the jig" shows the rhythm: load panel, drop stamp, strike, unload, next panel. Ten wallets, ten centred marks. No layout lines, no pencil marks to sand off later.
Building It on the Bench
Material Choices That Hold Up
The base is hard maple, 1-1/2 in thick, flat within a few thou across the clamping face. Maple takes a thread well, resists compression under the clamp, and does not mushroom when the stamp guide takes a glancing blow. The fences are brass — 1/2 in round bar, turned, drilled, and pinned. Brass wears slow, does not rust, and slides clean against leather without marking the grain. The stamp guide sleeve is O1 tool steel, hardened and tempered to straw, bore honed to a slip fit on the 3/8 in stamp shank. The vertical post is mild steel, dovetailed into the base, gib-adjusted for zero slop.
Layout Cut from the Work Itself
Every fence location derives from the actual panel blanks. The maker cuts a batch of bifold exteriors from a side of veg-tan, measures the stack, scribes the fence lines off the stack's centreline. The insert for the long wallet uses the same long-grain fence, new cross-grain stop. The passport sleeve insert uses a curved fence profiled to the flap radius — cut on the bandsaw, sanded to the line, pinned in place. The jig grows with the product line. When a new RAVEN Edition piece needs a mark in a new spot, the insert is an hour at the bench, not a week waiting for a machine shop.
Adjustment Built In
The dovetail gib on the vertical post takes a 4 mm hex key. One turn moves the stamp guide 0.05 mm. The maker dials it in on a scrap panel: stamp, check, tweak, stamp, check. Once the mark lands centred on the scrap, the gib locks. The clip "Lining up a stamp" shows this — a scrap of Chromexcel, a single strike, the maker peering down the barrel of a 10x loupe. The mark is centred. The gib locks. Production starts.
Stamping Mechanics the Jig Controls
Verticality
A tilted stamp drives the impression deeper on one side, shallower on the other. The sleeve forces the shank vertical. The maker still controls the hammer — 16 oz rawhide mallet, one strike, follow-through — but the tool cannot lean. On 4 oz veg-tan, a lean stamp cuts the fibre on the deep side and leaves a ghost on the shallow side. On 3 oz Chromexcel, it pulls the grain. The jig eliminates that variable.
Depth Consistency
Depth comes from leather moisture, stamp temperature, and hammer energy. The jig does not control those — the maker does. But because the stamp always bottoms out on the same plane, the only depth variable left is the leather itself. The maker cases the leather to a consistent temper: veg-tan at 60% moisture by feel, Chromexcel slightly drier. The stamp sits in the sleeve at room temp. One strike. The depth repeats because everything else repeated.
Alignment on Curved and Tapered Parts
The passport sleeve flap tapers. The card holder has a radius corner. The crossbody bag strap tab is a long thin triangle. Each gets an insert with a profiled fence. The stamp guide stays vertical; the workpiece registers on the curve. The clip "Lining up the next stamp" shows the maker swapping inserts: two thumb screws, lift the old fence, drop the new one, pinch the screws. Ten seconds. The next panel nests home.
Why Make the Jig Instead of Buying One
Commercial stamping jigs exist — cast iron, adjustable, expensive, generic. They assume standard sizes, standard stamp shanks, flat workpieces. A one-man shop running made-to-order commissions in East Vancouver faces non-standard sizes, custom stamp shanks, curved parts, and a bench that does double duty for cutting, skiving, stitching, and finishing. A shop-made jig fits the bench, the stamps, the workholding, the lighting. It modifies in an hour. It costs maple, brass, and an afternoon. And it teaches the maker something about the work every time it changes.
That last part matters. When the maker cuts the insert for a new RAVEN Edition passport sleeve, he learns the exact radius of the flap, the grain direction at the stamp site, the clearance needed for the stitch line. That knowledge shows up in the next pattern layout, the next skiving pass, the next edge finish. The tool is not separate from the craft; it is part of the craft.
Vancouver Realities: Rain, Transit, Bike Commuting
Leather lives on a bike rack in November rain. A bifold from 5 oz veg-tan takes a soak, dries, flexes at the fold. The Raven mark sits right on that fold line. If the mark was stamped crooked, the eye catches it every time the wallet opens. If it was stamped shallow, the rain wears it flat in a month. The jig puts the mark centred and deep enough to survive the break-in. Chromexcel on a crossbody bag strap sees sweat, UV, abrasion. The mark there is a reference point for the owner — proof the piece came from this bench, not a factory die cutter in a catalogue.
The maker picks up the phone at (250) 719-1332 or answers email at info@rogueartisan.ca when someone asks about a custom stamp placement on a RAVEN Edition piece. The answer is always: show me the drawing, I'll cut the insert, we'll stamp a test on a scrap. The jig makes that promise keepable.
Watch it happen at the bench
FAQ
What is a leather stamping jig?
A fixture that holds the workpiece and the stamp in a fixed, repeatable relationship so every impression lands square and centred without layout lines.
Why not use a commercial stamping press?
Presses are built for flat, repeatable parts in volume. Made-to-order work changes panel sizes, curves, and stamp locations per commission. A shop-made jig adapts in minutes; a press requires tooling changeovers that don't pay off at batch-of-one scale.
Can I stamp straight without a jig?
Yes — layout lines, a steady hand, and a good eye work for low volumes. But a jig removes the human variable on the alignment axis, leaving only hammer control and leather moisture to manage. For a maker stamping a maker mark on every piece that leaves the bench, the jig pays for itself in the first dozen wallets.
What materials hold up best for a shop-made jig?
Hard maple base, brass fences, hardened tool steel stamp guide. Maple stays flat, brass wears slow and won't mark leather, tool steel keeps the bore true through thousands of stamp drops.
How do you handle curved parts like a passport sleeve flap?
Swap-in inserts with profiled fences cut to the part's radius. The stamp guide stays vertical; the workpiece registers on the curve. Two thumb screws, ten seconds per changeover.
Does the jig work for hot foil stamping too?
Different beast. Foil needs heat, pressure, dwell time, and a type holder. The mechanical registration principle is the same — fixed relationship between workpiece and die — but the tooling, heating, and safety requirements mean a separate fixture. See the bench notes on hot foil stamping for that build.
Want to see the jig in action? The clips on this page — Building the stamping jig, Working the jig, Lining up a stamp, Lining up the next stamp — show the full sequence. If you have a custom piece that needs a mark in a specific spot, call (250) 719-1332 or email info@rogueartisan.ca. Local pickup in East Vancouver, ships across Canada.
Home About Custom Leather Wallets Saddle Stitching by Hand Cutting Leather from a Full Hide Skiving and Edge Finishing Leather Stamping Jig Commission a Piece